Ubuntu&CentOS安装Dokcer-CE

1. 背景

1.1 概述

Docker 使用 Google 公司推出的 Go 语言 进行开发实现,基于 Linux 内核的 cgroup,namespace,以及 AUFS 类的 Union FS 等技术,对进程进行封装隔离,属于 操作 系统层面的虚拟化技术。由于隔离的进程独立于宿主和其它的隔离的进程,因此也称其为容 器。最初实现是基于 LXC,从 0.7 版本以后开始去除 LXC,转而使用自行开发的 libcontainer,从 1.11 开始,则进一步演进为使用 runC 和 containerd。

Docker 在容器的基础上,进行了进一步的封装,从文件系统、网络互联到进程隔离等等,极 大的简化了容器的创建和维护。使得 Docker 技术比虚拟机技术更为轻便、快捷。

[TOC]

1.2 为什么要使用 Docker

作为一种新兴的虚拟化方式,Docker 跟传统的虚拟化方式相比具有众多的优势。

1.2.1 更高效的利用系统资源

由于容器不需要进行硬件虚拟以及运行完整操作系统等额外开销,Docker 对系统资源的利用 率更高。无论是应用执行速度、内存损耗或者文件存储速度,都要比传统虚拟机技术更高 效。因此,相比虚拟机技术,一个相同配置的主机,往往可以运行更多数量的应用。

1.2.2 更快速的启动时间

传统的虚拟机技术启动应用服务往往需要数分钟,而 Docker 容器应用,由于直接运行于宿主 内核,无需启动完整的操作系统,因此可以做到秒级、甚至毫秒级的启动时间。大大的节约 了开发、测试、部署的时间。

1.2.3 一致的运行环境

开发过程中一个常见的问题是环境一致性问题。由于开发环境、测试环境、生产环境不一 致,导致有些 bug 并未在开发过程中被发现。而 Docker 的镜像提供了除内核外完整的运行 时环境,确保了应用运行环境一致性,从而不会再出现 「这段代码在我机器上没问题啊」 这 类问题。

1.2.4 持续交付和部署

对开发和运维(DevOps)人员来说,最希望的就是一次创建或配置,可以在任意地方正常运 行。

使用 Docker 可以通过定制应用镜像来实现持续集成、持续交付、部署。开发人员可以通过 Dockerfile 来进行镜像构建,并结合 持续集成(Continuous Integration) 系统进行集成测试, 而运维人员则可以直接在生产环境中快速部署该镜像,甚至结合 持续部署(Continuous Delivery/Deployment) 系统进行自动部署。

而且使用 Dockerfile 使镜像构建透明化,不仅仅开发团队可以理解应用运行环境,也方便 运维团队理解应用运行所需条件,帮助更好的生产环境中部署该镜像。

1.2.5 更轻松的迁移

由于 Docker 确保了执行环境的一致性,使得应用的迁移更加容易。Docker 可以在很多平台 上运行,无论是物理机、虚拟机、公有云、私有云,甚至是笔记本,其运行结果是一致的。 因此用户可以很轻易的将在一个平台上运行的应用,迁移到另一个平台上,而不用担心运行 环境的变化导致应用无法正常运行的情况。

1.2.6 更轻松的维护和扩展

Docker 使用的分层存储以及镜像的技术,使得应用重复部分的复用更为容易,也使得应用的 维护更新更加简单,基于基础镜像进一步扩展镜像也变得非常简单。此外,Docker 团队同各 个开源项目团队一起维护了一大批高质量的 官方镜像,既可以直接在生产环境使用,又可以 作为基础进一步定制,大大的降低了应用服务的镜像制作成本。

1.2.7 对比传统虚拟机总结

特性 容器 虚拟机
启动 秒级 分钟级
硬盘使用 一般为MB 一般为GB
性能 接近原生 弱于
系统支持量 单机支持上千个容器 一般几十个

1.3 环境

  • Ubuntu 18.04.3 LTS
  • CentOS Linux release 7.5.1804
  • Docker 19.03.2, build 6a30dfc

老版本的 Docker 被称为 docker 或 docker-engine。如果安装了这些版本,先卸载它们,以及相关的依赖项。

2. 卸载旧版本

  • Ubuntu
1
sudo apt-get remove docker docker-engine
  • CentOS
    1
    2
    3
    4
    5
    sudo yum remove docker \
    docker-common \
    container-selinux \
    docker-selinux \
    docker-engine

3. 安装Docker

APT/YUM安装和脚本安装二选一即可

3.1 Ubuntu使用 APT 安装

1
2
3
4
5
6
7
8
9
10
# 更新数据源
sudo apt-get update
# 安装所需依赖
sudo apt-get -y install apt-transport-https ca-certificates curl software-properties-common
# 安装 GPG 证书
sudo curl -fsSL http://mirrors.aliyun.com/docker-ce/linux/ubuntu/gpg | sudo apt-key add -
# 新增数据源
sudo add-apt-repository "deb [arch=amd64] http://mirrors.aliyun.com/docker-ce/linux/ubuntu $(lsb_release -cs) stable"
# 更新并安装 Docker CE
sudo apt-get update && apt-get install -y docker-ce

3.2 CentOS使用YUM安装

1
2
3
4
5
6
7
8
# 安装yum-utils
sudo yum install -y yum-utils
# 安装repo
sudo yum-config-manager \
--add-repo \
https://download.docker.com/linux/centos/docker-ce.repo
# 安装docker-ce
sudo yum install docker-ce docker-ce-cli containerd.io

3.3 使用脚本自动安装

在测试或开发环境中 Docker 官方为了简化安装流程,提供了一套便捷的安装脚本,Ubuntu 系统上可以使用这套脚本安装,另外可以通过 --mirror 选项使用国内源进行安装:

1
2
curl -fsSL get.docker.com -o get-docker.sh
sudo sh get-docker.sh --mirror Aliyun

执行这个命令后,脚本就会自动的将一切准备工作做好,并且把 Docker CE 的稳定(stable)版本安装在系统中。

国内用户如果碰到速度过慢问题,推荐使用DaoCloud的镜像,在这里感谢DaoCloud

curl -sSL https://get.daocloud.io/docker | sh

3.4 查看Docker版本

sudo docker version
输出如下

1
2
3
4
5
6
7
8
9
10
11
12
13
14
15
16
17
18
19
20
21
22
23
24
25
26
27
Client: Docker Engine - Community
Version: 19.03.2
API version: 1.40
Go version: go1.12.8
Git commit: 6a30dfc
Built: Thu Aug 29 05:29:11 2019
OS/Arch: linux/amd64
Experimental: false

Server: Docker Engine - Community
Engine:
Version: 19.03.2
API version: 1.40 (minimum version 1.12)
Go version: go1.12.8
Git commit: 6a30dfc
Built: Thu Aug 29 05:27:45 2019
OS/Arch: linux/amd64
Experimental: false
containerd:
Version: 1.2.6
GitCommit: 894b81a4b802e4eb2a91d1ce216b8817763c29fb
runc:
Version: 1.0.0-rc8
GitCommit: 425e105d5a03fabd737a126ad93d62a9eeede87f
docker-init:
Version: 0.18.0
GitCommit: fec3683

3.5 systemd启动Docker并配置开机自启

1
2
sudo systemctl start docker
sudo systemctl enable docker

3.6 配置镜像加速器

阿里云、DaoCloud、USTC镜像三选一即可

  • 阿里云镜像镜像加速器,登录自己的阿里云官网,找到镜像加速器,根据提示进行配置
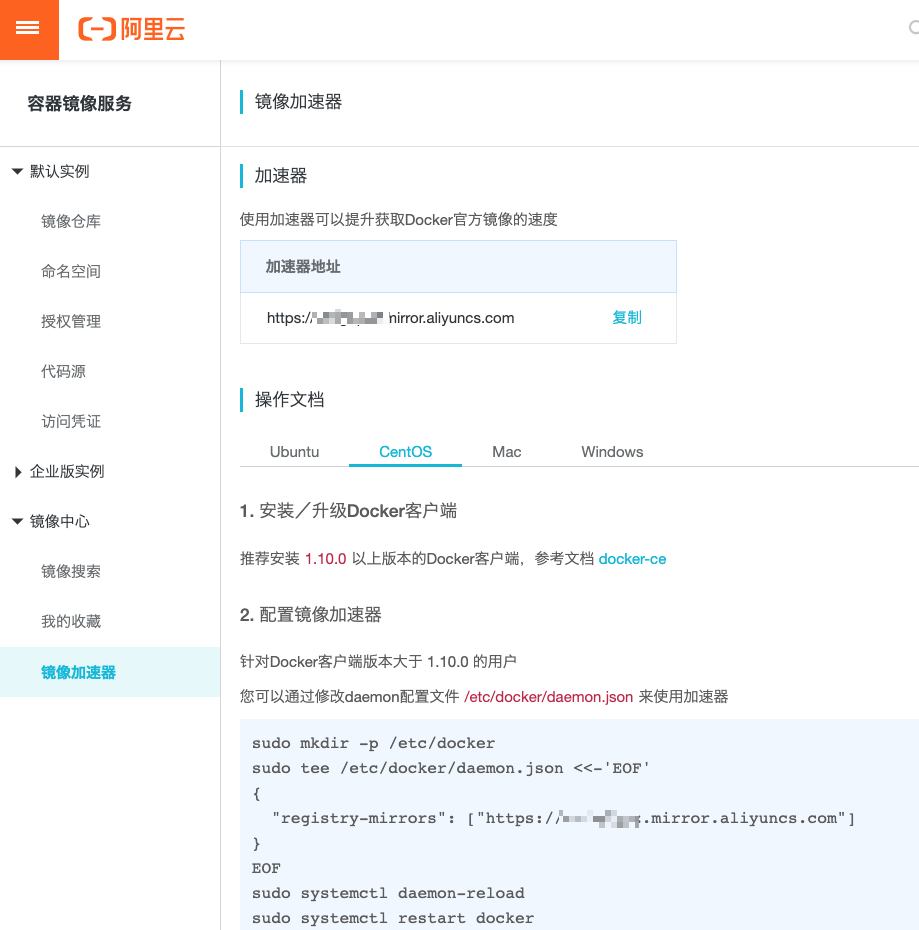
  • DaoCloud 镜像站
1
http://f1361db2.m.daocloud.io
  • USTC镜像
1
https://docker.mirrors.ustc.edu.cn

3.7 允许Docker测试示例

docker run hello-world

输出如下

1
2
3
4
5
6
7
8
9
10
11
12
13
14
15
16
17
18
19
20
21
22
23
24
25
26
Unable to find image 'hello-world:latest' locally  # 本地无镜像
latest: Pulling from library/hello-world #从远程仓库拉取
1b930d010525: Pull complete
Digest: sha256:c3b4ada4687bbaa170745b3e4dd8ac3f194ca95b2d0518b417fb47e5879d9b5f
Status: Downloaded newer image for hello-world:latest

Hello from Docker!
This message shows that your installation appears to be working correctly.

To generate this message, Docker took the following steps:
1. The Docker client contacted the Docker daemon.
2. The Docker daemon pulled the "hello-world" image from the Docker Hub.
(amd64)
3. The Docker daemon created a new container from that image which runs the
executable that produces the output you are currently reading.
4. The Docker daemon streamed that output to the Docker client, which sent it
to your terminal.

To try something more ambitious, you can run an Ubuntu container with:
$ docker run -it ubuntu bash

Share images, automate workflows, and more with a free Docker ID:
https://hub.docker.com/

For more examples and ideas, visit:
https://docs.docker.com/get-started/

3.8 查看Docker版本信息

sudo docker info

输出如下

1
2
3
4
5
6
7
8
9
10
11
12
13
14
15
16
17
18
19
20
21
22
23
24
25
26
27
28
29
30
31
32
33
34
35
36
37
38
39
40
41
42
43
44
45
46
47
48
49
Client:
Debug Mode: false

Server:
Containers: 0 # 容器数
Running: 0 # 运行容器数
Paused: 0 # 暂停容器数
Stopped: 0 # 停止容器数
Images: 0
Server Version: 19.03.2
Storage Driver: overlay2
Backing Filesystem: extfs
Supports d_type: true
Native Overlay Diff: true
Logging Driver: json-file
Cgroup Driver: cgroupfs
Plugins:
Volume: local
Network: bridge host ipvlan macvlan null overlay
Log: awslogs fluentd gcplogs gelf journald json-file local logentries splunk syslog
Swarm: inactive
Runtimes: runc
Default Runtime: runc
Init Binary: docker-init
containerd version: 894b81a4b802e4eb2a91d1ce216b8817763c29fb
runc version: 425e105d5a03fabd737a126ad93d62a9eeede87f
init version: fec3683
Security Options:
apparmor
seccomp
Profile: default
Kernel Version: 4.15.0-65-generic
Operating System: Ubuntu 18.04.3 LTS
OSType: linux
Architecture: x86_64
CPUs: 2
Total Memory: 3.847GiB
Name: Paas
ID: 6VRF:YBNF:N6ZG:MLAW:WS7P:ULYU:UJJT:CC43:H43S:XQNJ:PO4K:FALJ
Docker Root Dir: /var/lib/docker
Debug Mode: false
Registry: https://index.docker.io/v1/
Labels:
Experimental: false
Registry Mirrors:
https://xxxxxx.mirror.aliyuncs.com/
Live Restore Enabled: false

WARNING: No swap limit support

4. 开启Docker Remote API

修改配置文件

1
vim /usr/lib/systemd/system/docker.service

找到ExecStart=/usr/bin/dockerd行,修改如下:

1
ExecStart=/usr/bin/dockerd  -H tcp://0.0.0.0:2375  -H unix:///var/run/docker.sock

编辑配置文件vim /etc/profile, 写入一下内容, 执行source /etc/profile刷新

1
export DOCKER_HOST=127.0.0.1:2375

执行命令

1
2
systemctl daemon-reload
systemctl restart docker

执行curl http://127.0.0.1:2375/info验证

输出如下

1
{"ID":"HPZP:XIWJ:BZP7:YI47:UOLX:YLMM:LBF7:KV4E:Y2A7:ED6B:BHWB:FE4R","Containers":2,"ContainersRunning":0,"ContainersPaused":0,"ContainersStopped":2,"Images":2,"Driver":"overlay2","DriverStatus":[["Backing Filesystem","xfs"],["Supports d_type","true"],["Native Overlay Diff","true"]],"SystemStatus":null,"Plugins":{"Volume":["local"],"Network":["bridge","host","macvlan","null","overlay"],"Authorization":null,"Log":["awslogs","fluentd","gcplogs","gelf","journald","json-file","logentries","splunk","syslog"]},"MemoryLimit":true,"SwapLimit":true,"KernelMemory":true,"CpuCfsPeriod":true,"CpuCfsQuota":true,"CPUShares":true,"CPUSet":true,"IPv4Forwarding":true,"BridgeNfIptables":true,"BridgeNfIp6tables":true,"Debug":false,"NFd":20,"OomKillDisable":true,"NGoroutines":33,"SystemTime":"2018-04-08T15:41:52.725705339+08:00","LoggingDriver":"json-file","CgroupDriver":"cgroupfs","NEventsListener":0,"KernelVersion":"3.10.0-693.21.1.el7.x86_64","OperatingSystem":"CentOS Linux 7 (Core)","OSType":"linux","Architecture":"x86_64","IndexServerAddress":"https://index.docker.io/v1/","RegistryConfig":{"AllowNondistributableArtifactsCIDRs":[],"AllowNondistributableArtifactsHostnames":[],"InsecureRegistryCIDRs":["127.0.0.0/8"],"IndexConfigs":{"docker.io":{"Name":"docker.io","Mirrors":["https://0zs97su8.mirror.aliyuncs.com/"],"Secure":true,"Official":true}},"Mirrors":["https://0zs97su8.mirror.aliyuncs.com/"]},"NCPU":1,"MemTotal":1022570496,"GenericResources":null,"DockerRootDir":"/var/lib/docker","HttpProxy":"","HttpsProxy":"","NoProxy":"","Name":"localhost","Labels":[],"ExperimentalBuild":false,"ServerVersion":"18.03.0-ce","ClusterStore":"","ClusterAdvertise":"","Runtimes":{"runc":{"path":"docker-runc"}},"DefaultRuntime":"runc","Swarm":{"NodeID":"","NodeAddr":"","LocalNodeState":"inactive","ControlAvailable":false,"Error":"","RemoteManagers":null},"LiveRestoreEnabled":false,"Isolation":"","InitBinary":"docker-init","ContainerdCommit":{"ID":"cfd04396dc68220d1cecbe686a6cc3aa5ce3667c","Expected":"cfd04396dc68220d1cecbe686a6cc3aa5ce3667c"},"RuncCommit":{"ID":"4fc53a81fb7c994640722ac585fa9ca548971871","Expected":"4fc53a81fb7c994640722ac585fa9ca548971871"},"InitCommit":{"ID":"949e6fa","Expected":"949e6fa"},"SecurityOptions":["]}

5. 安装 Docker Compose

5.1 运行此命令下载最新版本的Docker Compose

1
curl -L https://github.com/docker/compose/releases/download/1.24.0/docker-compose-`uname -s`-`uname -m` > /usr/local/bin/docker-compose

上面的命令是一个例子,可能会过时,为了确保使用最新的版本,请前往 Github Compose repository release 查看最新版本

国内用户如果碰到速度过慢问题,可以使用DaoCloud的镜像,这里再次感谢DaoCloud

curl -L https://get.daocloud.io/docker/compose/releases/download/1.24.0/docker-compose-`uname -s`-`uname -m` > /usr/local/bin/docker-compose

5.2 给可执行文件添加权限

1
sudo chmod +x /usr/local/bin/docker-compose

5.3 验证安装docker-compose –version

1
docker-compose version

输出如下

1
2
3
4
docker-compose version 1.24.0, build 0aa59064
docker-py version: 3.7.2
CPython version: 3.6.8
OpenSSL version: OpenSSL 1.1.0j 20 Nov 2018

参考资料:

  1. Docker 官方安装文档
  2. Docker Compose 官网安装文档
  3. DaoCloud